SPECIALIZATION
REAL-TIME PROCEDURAL MESH FRACTURING
Team: Me
Duration: 120h
Engine: RockSolidEngine (custom engine)
The specialization was our final non-game project course at The Game Assembly.
Here we could make whatever we wanted for our portfolio, as well as the portfolio itself.
I chose to make a mesh fracturing system.
MOTIVATION
I always enjoy when video game worlds feel real, and not just like cold static meshes.
We often try to achieve this through graphical effects, animations, shaders and such.
But what if we could do it through gameplay?
By allowing the player to alter their environment, those static meshes all of a sudden don’t feel so static anymore!
GOAL
After having done some research on the subject, the paper “Dynamic Fracture with Volumetric Approximate Convex Decompositions” by Müller et al. [1] stuck out to me as an excellent resource to base my work on.
The goal became to replicate their method of fracture of convex meshes.
OVERVIEW
The method of achieving procedural fracture is robust and efficient.
It works by applying a user-defined fracture pattern at chosen location on the mesh, allowing for localised fracturing into an unlimited number of pieces.
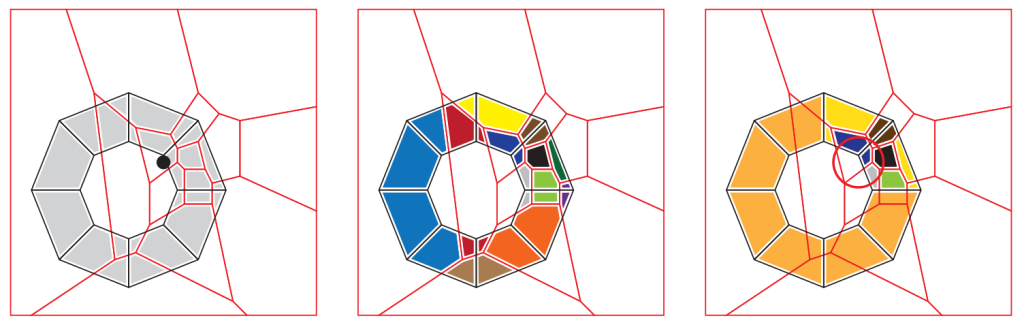
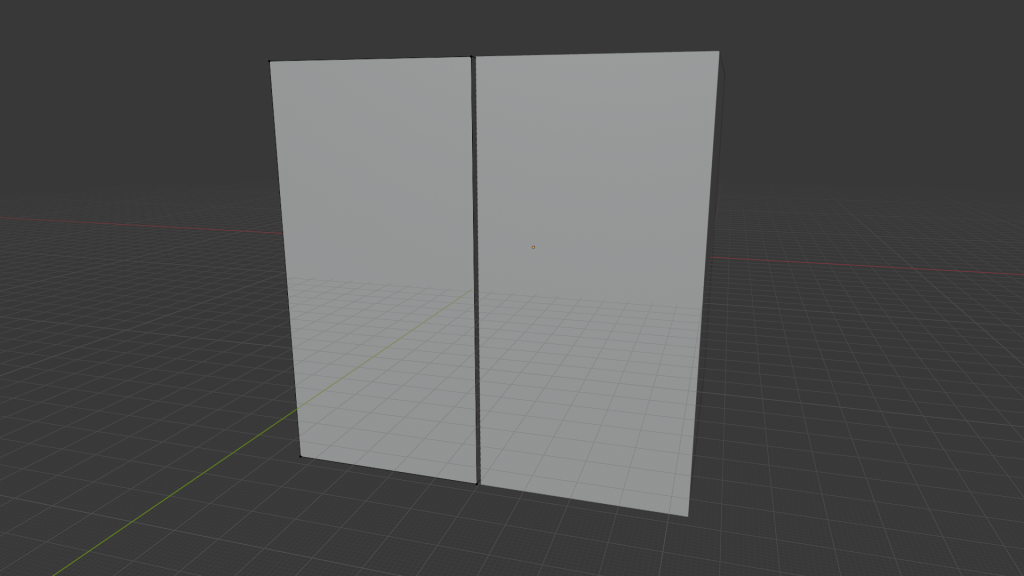
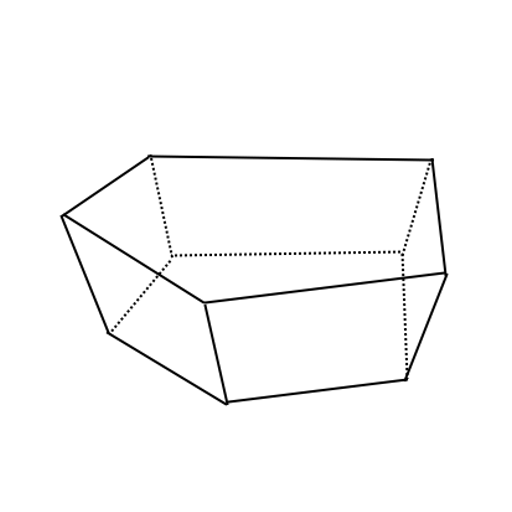
1. Provide a compound mesh consisting of one or several convex meshes, as well as a fracture pattern. Both of these are, simply put, a cluster of convex shapes. The compound is the mesh that we want to fracture. We are limited to convex shapes, but the compound structure allows us to put many convexes together in order to somewhat alleviate this limitation. The fracture pattern is a cube cut up into convex regions, which we overlap with the compound mesh and move it into the compound’s space.
2. Calculate the overlap region between each cell of the fracture pattern and each convex shape of the compound. (Coloured regions)
3. Limit fracture to convexes within the impact volume. Create new compounds from the cell/convex overlaps.
I regard it as procedural rather than merely dynamic because the deformation of the shape occurs in real time, resulting in a mesh unique to the inputs provided.
THE WORK
Convex data structure
First, we need an appropriate data structure that can represent the convex meshes that we want to fracture in a way that makes it simple to work on.
Initially this was quite haphazard, as I just threw whatever I thought I needed in there.
I did this knowingly so as to get to work quickly, I could refactor it later when I knew what I actually needed.
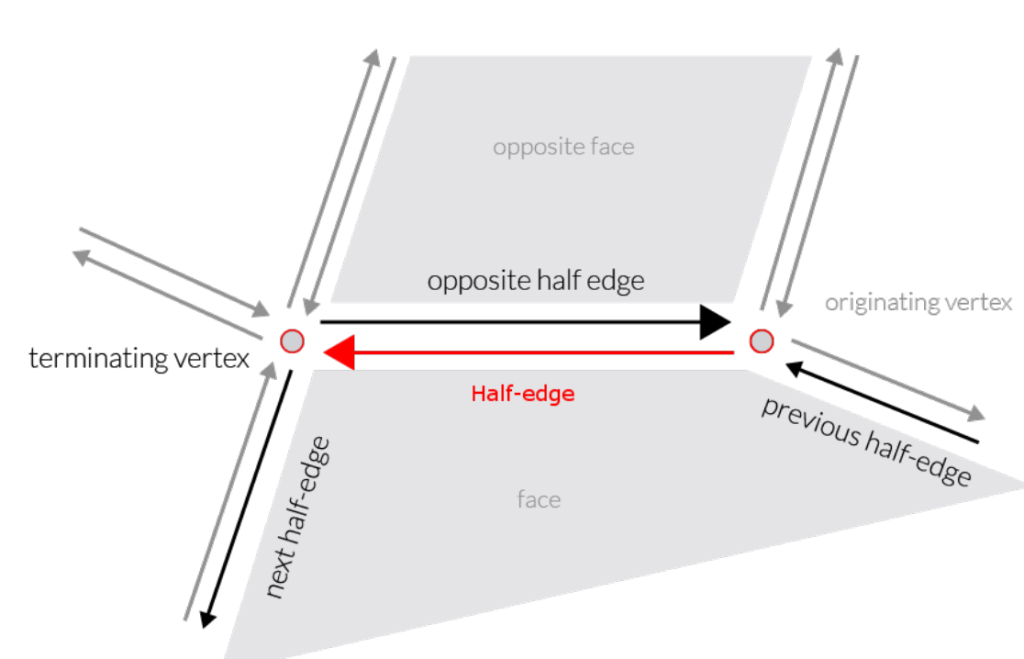
This came upon me quite quickly when the data became too unwieldy to work with, as well as missing crucially needed structure. Whilst researching destruction in video games, I had come upon the half-edge data structure mentioned in “Real-time Mesh Destruction System for a Video Game” by Grönberg [2]. It seemed like a promising option as it provided the structure I needed to traverse the mesh.
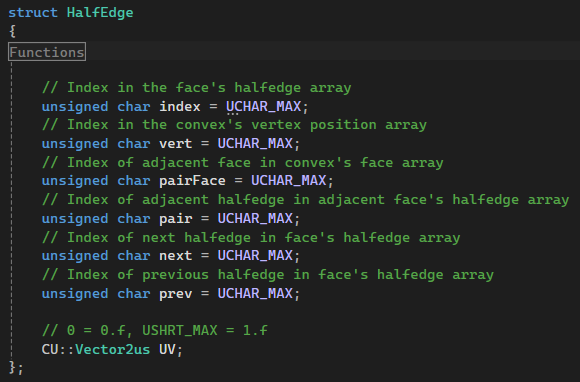
The half-edge represents an edge of a face of a mesh. It is called half-edge because the two faces that share the edge actually have two entirely separate half-edges. What is so great about half-edges is that they contain references to everything around them. Their vertex, the previous edge on the face, the next edge on the face, as well as the opposite edge on the adjacent face.
Though this was an upgrade, it led directly to the next problem, copying a convex.
I knew I needed to copy convexes many times in a fracture operation, so it had to be very fast.
Copying a convex with a vector full of faces each with a vector full of half-edges, seemed like a lot of heap allocations. All the pointers in the half edges also had to be adjusted, and these pointers also made the half-edges very large. I concluded that this was a slow, complex, and memory inefficient system.
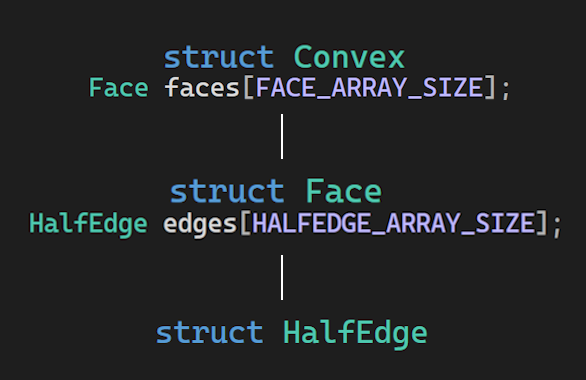
To address this, I made the vectors into arrays instead.
Now I no longer needed to allocate heap memory whenever I added something to a convex, only once when creating the convex. I also didn’t need to adjust pointers anymore, since I could use indices instead.
Further, this leaves a far smaller memory footprint.
How do we traverse this data structure then?
A half-edge needed to know which face it belonged to and have access to that same face.
But how could I avoid giving the half-edge a pointer to their face, which would immediately become invalid whenever the convex was copied? The answer was to mess around with the memory.
Instead of storing a direct pointer, I assigned each half-edge their index in the face’s half-edge array. Since the half-edge array is the first element in the face’s memory layout, I could simply move backwards in memory by a number of half-edge-sized steps equal to the index. This would bring me to the start of the array, which shares the same memory address as the face itself. By casting this address to a Face*, I could retrieve the face.

Fracture pattern data structure

Second, we need a fracture pattern with which to cut up the convex meshes.
Because all we need from the pattern is the planes of the cell’s faces, this can simply be represented by one plane volume per cell.
Initialy, because it was simple and easier to debug, the fracture pattern data structure would contain faces and vertices. I knew however that using plane volumes would be less memory intensive.
Before running the fracture algorithm, I need to align the fracture pattern with whatever is being fractured, and also move the pattern into its local space. This requires a lot of matrix multiplications, which is quite a slow operation. Because there will often be much fewer vertices than faces, I believed that perhaps multiplying the vertices and then creating the planes using those vertices would be faster than creating the planes beforehand and multiplying the many planes, especially because both the plane’s normal and position need to be matrix multiplied. Creating those planes isn’t necessarily cheap either however, as it entails one cross product operation and one vector normalization per plane.
Because I was unsure, I decided to test it out.
It turned out that not only is the plane volume solution 54.9% less memory intensive, it also manages to be 87.7% faster. With it being such a clear winner, I rebuilt the system to utilize plane volumes instead.
Fracture patterns can be generated from meshes. Here are two I made in Blender.
Fracture algorithm
Lastly, we get to the heart of the project, the fracture algorithm itself.
On a high level, we simply cut each convex along the faces of each cell, removing anything outside the face of the cell. Because the cell is convex, this leaves us with the overlap between the convex and the cell.
Because the convex is also well um… convex, the overlap itself must also be convex.
Eureka! Now we just need to finish up by creating gameobjects, colliders, and visual meshes for our new convexes.
But this only scratches the surface, because what actually happens when we cut a convex along a plane?
Quite a bit as it turns out. Let’s break it down.

1. Growing
This step and the last step exist because of the greatest limitation that comes with statically allocating our convexes, they can’t get too big! But when we cut them they can grow in detail quite a lot, so what do we do?
They solution I came up with was to temporarily copy the convex to a larger format. This way it’s fine for the convex to grow beyond its normal bounds during the cutting process itself.
2. Hit detection
This is where the fun begins. We go through the half-edges one by one and intersect them with the plane. To make this a bit faster we skip the half-edges where the next vertex index is smaller than their own. This way we avoid doing double the work because of our half-edge data structure.
When we do detect a hit, we add the position as a vertex to the convex, and record the hit on both faces adjacent to the edge.
3. Face cutting
Now we have collected all the intersection points to cut along. We know that when a plane intersects a convex face, it will always enter through one edge and exit through another. The only exceptions to this are when a vertex is perfectly on the plane, but this is an edge case that is easily handled.
To take advantage of this, we simply modify the edges that were cut by the plane so that they now end and begin at the intersection respectively. We then remove all the edges that are outside the plane, and create a new edge between the intersection points.
4. Hole filling
Now we’re left with a big hole in the convex, left by the cutting plane. We know which edges are the new ones, but how do we make sure the winding order is correct?
I’ll try spinning, that’s a good trick! We can generate a face for the hole by taking one of the new half-edges that lay adjacent to hole, and traverse along our edges until we’ve looped around.
We go backwards, jump to the adjacent face, and backwards again, over and over.
5. Cleanup
Now we can collect and discard all of the vertices and faces that lay entirely outside the plane, they are of no use to us now.
6. Shrinking
Now we have to make sure the convex didn’t grow out of bounds. If it did, we have to cut it some more.
Cutting a face that’s too large is simple. We just take two vertices that are opposite each other and cut along them. We know this will work because all points in a convex polygon can always “see” each other.
If there are too many faces or vertices it is more difficult. We have to cut the convex again, hoping that the two resulting convexes are less detailed. We can do this repeatedly until they’re simple enough.
RESULTS
I am very happy with the results.
I am able to destroy most geometry in practically any way I’d like.
I’m particularly satisfied with the performance, which I attribute in great part to running the entire cutting algorithm on the stack, with no heap allocations being made.
To the right you can see nine fractures happening simultaneously, using quite an advanced fracture pattern, with barely any impact on game performance whatsoever.
When done 100 times at once, it becomes at lot more noticeable. This is however to a large degree because of the creation of new PhysX colliders, which limits how much performance I can squeeze out.

FUTURE WORK
1. Generate convex mesh from regular mesh
Currently destructible meshes need to be specially constructed, with one element representing each convex.
I would like make an algorithm that generates a destructible mesh from any mesh, splitting up the mesh into convex regions dynamically. This would make the process of implementing destructible items in a game much more streamlined.
2. Fracture pattern tool
Making fracture patterns can be quite time consuming. I made the fracture patterns I’ve used myself, and while I am certain an actual artist would be much faster, making sure everything is convex just using the Mark I Eyeball isn’t the most fun one could be having.
A specialised tool where the user can create fracture patterns by simply placing voronoi nodes would be much preferable.
3. Simple structural integrity
At the moment the parts of the fractured mesh that remain static may be floating.
Ensuring that each static part connects to something static and non-destructible, through other destructibles or directly, could solve this issue.
FINAL THOUGHTS
This project has been one of the most rewarding technical challenges I’ve taken on during my time at The Game Assembly. It taught me not only how to implement a complex algorithm from academic research, but also how to adapt and optimize it to fit the real-time constraints of a game engine.
I find the challenge of building these kinds of large-scale systems immensely stimulating; it’s where gameplay design meets engine architecture, an area which I believe allows for some of the most exciting and impactful contributions to a game, pushing the boundaries of what’s possible. It’s exactly where I hope to be working in my future career as a game developer.
ACKNOWLEDGEMENTS
Special thanks to Filip Tripkovic who built most of our custom engine, RockSolidEngine.
Special thanks to Ingrid Renlund who helped me greatly in setting up this site.